Thermal Imaging

Thermal imaging is not a new thing, in fact we use it on every inspection to help us in identifying possible moisture, but it can be beneficial in many other circumstances.  It is not magic, and it cannot see through walls. There are certain conditions where it works and where it doesn’t work. It takes a trained and experienced inspector with the right tools to ascertain what the thermal images could mean. That’s why I recently obtained my Certified Residential Thermographer training and certification.

Certified Residential Thermographer Seal

In the following post, I will describe the benefits to a performing a dedicated thermal inspection or as an add-on service when purchasing your new home!

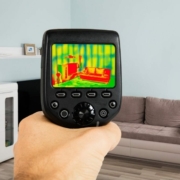
What is a thermal inspection?

Thermographic inspections measure surface temperatures by using infrared cameras. These cameras see light that is in the infrared, or heat, spectrum. The images created record the surface temperature variations of the objects in frame. The created images assist the inspector in identifying thermal abnormalities. These abnormalities are just that, abnormalities.  They can identify that something unusual is happening there but it cannot identify what is occurring. Without appropriate follow up inspection such as the use of a moisture meter, the thermal images only provide half the story. Further information can be found at the US Department of Energy’s site.

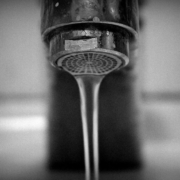
1. HIDDEN MOISTURE & MOLD

Having mold around the house is always unpleasant, and if it’s left unattended, it can quickly become a health hazard. However, mold cannot grow without moisture.  Thermal cameras are great tools to help identify potential moisture in walls and ceilings that would otherwise have gone unnoticed.  Remember, it needs to be followed up by using a moisture meter to confirm though. Once these locations are identified though, it becomes a lot easier to deal with this problem. Remove the mold and damaged building components, fix the source of moisture, dry the area out, clean and repair. Remember, this will only work if there is moisture that is at a different temperature than the surrounding building materials. I include a quick thermal scan on every inspection of the walls, ceiling and floors but a full thermal inspection is much more intensive.

2. ELECTRICAL HOTSPOTS

Over time, the electrical wiring system placed throughout the home could begin to deteriorate. Thermal imaging can help identify the locations of electrical hot spots and other anomalies, which if not corrected could lead to potential dangers. During a full thermal inspection, I will scan the interior of the electrical panel and all electrical receptacles and switches. The scan will show a thermographic anomaly (hot spot) on failing connections.  Absolutely no electrical connection should be hotter than the other components and wiring on that circuit. Again, this only identifies a potential problem and I will then recommend an electrician further assess the connection point or device.  Thermal scans are now required to be performed on many commercial electrical systems on a regular basis. If it’s required for commercial properties, then there is a clear need for this safety inspection and the government has now mandated it.

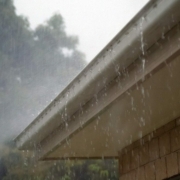
3. DETECTION OF VARIOUS STRUCTURAL DEFECTS

Walls, floors, ceilings, and roofs will all show a difference in temperature at certain areas due to thermal bridging, assuming an adequate thermal variance between the exterior and interior of the home.  A thermal anomaly could indicate that there may be a problem, such as damaged or missing structural components. For roofs, in particular, thermal imaging can show if there is moisture gathering at specific points, indicating that there is a leak somewhere on the roof. During a full thermal inspection, I will scan the exterior and interior of the home as well as the attic. Any anomalies may need further investigation but generally it’s pretty clear what the issue is.

4. ENERGY EFFICIENCY

As a homeowner, nobody likes paying too much for electricity or gas.  We should strive to make, and then keep, our homes as energy-efficient as possible. A thermal imaging inspection can help detect areas that could use improvement.  Normally, doorways and windows are the biggest sources of air infiltration and thermal imaging will help identify potential areas of improvement.  Additionally, a thermal scan can help identify areas of missing insulation by locating areas that the insulation is either not installed or not performing.  During a full thermal inspection, I will scan all walls, windows, doors and ceilings looking for anomalies.

5. PEST DETECTION

While this is much harder to detect with a thermal camera, it is possible to identify bees, rodents and even termites in walls or attics. Keep in mind, the thermal camera only looks for variations in heat, so the nest would need to be directly against an interior wall or ceiling and warm enough to conduct the heat into the drywall. This is the opposite of when the thermal imager is used to detect moisture but it still works!

I hope this helps explain what a thermal imager can do for you.  A sample thermal report can be found here:  https://reports.spectora.com/home-inspectors/my-inspection-company-7d056f8a70/sample_report?sample_id=25776

Please call us if you would like us to perform a full thermal imaging inspection for you!

As the chill and rains of winter settle in here in the gulf coast region, it’s time to prepare your home for the cold and wet months ahead. Winterizing your home not only ensures your comfort but also helps you save on energy bills and prevents potential damage. In this blog post, we’ll guide you through essential tips to winterize your home and create a cozy haven during the frosty season.

Introduction

Winter is a time of hot cocoa, crackling fires, and snug blankets. But it’s also a season that demands special attention to protect your home from the harsh elements. By taking the necessary steps to winterize your home, you can ensure energy efficiency, maintain a warm and comfortable environment, and safeguard your property from potential hazards or damage.

Preparation Checklist

To winterize your home effectively, it’s crucial to pay attention to key areas. Here’s a checklist to guide you:

  • Insulation and Weatherstripping: Check for any gaps or drafts around windows, doors, and other openings. Seal them with weatherstripping or caulk to keep the cold air out and the warm air in. Be sure to pay attention to the caulking around the exterior window frames.With the wind driven rain we sometimes get, it’s a good idea to check that yearly.
  • HVAC System Maintenance: Have your heating system serviced by a professional HVAC technician to ensure optimal performance. Yearly maintenance is fairly cheap and can provide you some peace of mind if the weather turns bad. Clean or replace air filters regularly to improve air quality and energy efficiency.
  • Plumbing Protection: Prevent frozen pipes by insulating them and keeping the temperature above freezing. Disconnect outdoor hoses and cover exterior faucets. Don’t forget about the plumbing lines in any outdoor kitchens!
  • Roof and Gutter Maintenance: Clear debris from gutters to allow better rainwater drainage. Inspect your roof for damaged shingles or leaks from both the interior of your attic and at roof level. Address any issues promptly as neglect will only cost you more in the long run.
  • Safety Measures: Test smoke detectors and carbon monoxide detectors. Ensure fire extinguishers are accessible and in good working condition.
  • Know your house: Ensure you can access your main electrical disconnect, main gas shutoff and main water shutoff. You never know when you might need them and you don’t want to be searching for them when you do. If I previously did your home inspection, it is in the report.

Efficiency and Cost Savings

Winterizing your home not only keeps you cozy but also helps you save on energy bills. By implementing these measures, you can enjoy the following benefits:

  • Reduced Energy Consumption: Proper insulation and weatherstripping prevent heat loss, reducing the need for excessive heating.
  • Tax Incentives and Rebates: Some energy-efficient upgrades may qualify for tax incentives or rebates, allowing you to save even more.

Safety and Comfort

Winterizing your home also ensures a safe and comfortable environment for you and your family. Consider the following:

  • Preventing Frozen Pipes: Proper insulation and keeping the temperature above freezing help prevent pipes from freezing and bursting, saving you from costly water damage.
  • Warm and Cozy Indoor Environment: By sealing drafts and maintaining a consistent indoor temperature, you can create a cozy and comfortable space for winter hibernation.

Professional Home Inspection

While DIY winterization measures can go a long way, it’s always beneficial to schedule a professional to make an unbiased and experienced assessment. A qualified home inspector can assess your home’s unique needs and provide recommendations tailored to your property. While I will always recommend an HVAC technician perform maintenance, you may not need to hire a roofer, a plumber or a general contractor if there are only easy DIY fixes. We perform our annual maintenance inspection (for previous clients) for a flat fee of $300. While very similar to the previous full home inspections, it does lack some level of detail. We may not test every window, door, light or receptacle but we do focus on the major systems and those items that will keep your home healthy and safe.  You can schedule your Annual Maintenance Inspection here: https://www.solidiuminspections.com/request-an-inspection/

Conclusion

Winterizing your home is a vital step to protect your investment and create a warm and comfortable haven during the chilly and wet months. By following the essential tips outlined in this blog post, you’ll improve energy efficiency, enhance safety, and enjoy some cost savings. Don’t wait until the weather turns bad—take action now and winterize your home or schedule an annual maintenance inspection to ensure your home is ready to face winter’s embrace.

While most homeowners look for ways to cut expenses and lower the monthly bills, since we haven’t had any significant rain for over a month and many MUDs are asking us to limit our water usage. Here are some simple tips to help you save water at home.

Turn Off the Tap to Save Water at Home

When brushing your teeth, shaving, or washing your hands, turn off the tap until it’s needed. Use the water to dampen your skin or toothbrush, but then turn it off to brush your teeth or lather your hands. When it’s time to rinse, turn the water on again. If each person in your family practices turning off the tap, you can save over 20 gallons of water every day.  Additionally, dishwashers actually are very water conscious and use less water than if you washed the dishes by hand, so don’t be afraid to use it.

Ensure the Sprinkler System is not Wasting Water

Sprinkler systems are excellent tools to keep your lawn looking green and ensuring it get enough water but only when it’s operating correctly.  That’s one reason we include a free visual inspection of the system when we do our home inspections.  If it’s not working correctly, it can waste a large amount of water.  While you may get a littler wet, testing the system if extremely easy to do.  Most control panels have a “test system” option that allows you to run the zone for a few minutes while you inspect each sprinkler head or rotator. Don’t forget to watch the ground where the pipes most likely run, to see if you can pick up any underground leaks. A good indicator is a lack of pressure in some or all of the heads. If you think you have an issue, don’t worry about diagnosing the cause, just call a sprinkler repair person.  They have the tools and the knowledge to make it an easy fix.

Use a Rain Barrel

A rain barrel is a great way to repurpose the water that travels through your home’s guttering system. Install the rain barrel at the end of the downspout and use what’s collected to water your lawn and gardens. Rain barrels are inexpensive, easy to install, and will provide plenty of water for your landscape.  The hard part is distributing that water to your lawn.  The easy fix I have found is that you can use it on your flowerbeds and not to worry about the lawn. Let the sprinkler system do that but now it will use less water as it can skip the flowerbeds.

Repurpose Water in Your Home

To reduce your monthly bill, reuse water around the house. If you make pasta for dinner, save the water and use it for your indoor plants. You can also reserve water used for washing vegetables for the same purpose. While you’re waiting for your bath water to warm up, collect the cool water in a bucket. This water is useful for cleaning and for watering plants.

Take Shorter Showers

The average American showers for eight minutes every day. Use a stopwatch and pay attention to how much time you spend showering, then work to reduce this by a minute or two. For each minute you shower, you use approximately two gallons of water. Reducing your shower time by just two minutes can save over 20 gallons of water every week.

Save Water at Home: Repair Leaks

A dripping faucet wastes five gallons of water every day. In a month, this is 150 gallons of water that you’re paying for but not really using. A leaking toilet can use 200 gallons every day. This adds over $70 to your water bill each month.

If you’re uncertain whether the toilet is leaking, test it by dropping food coloring into the tank and waiting about 20 minutes. If the color appears in the toilet bowl, you have a leak. Repair plumbing problems to save water and lower utility bills.

Solidium Inspections provides home inspections to customers in Houston, TX, and the surrounding areas. Contact us to request our services.

Indoor air quality affects the well-being of everyone in your household. Here are 5 ways to improve indoor air quality in your home.

Change Air Filters to Improve Indoor Air Quality

Replacing the HVAC air filter on time is important not only to help the health of your system but to keep your indoor air clean. Once a filter becomes dirty and clogged, it sends dust and particles out of the vents and into your HVAC system and back into your home. It also slows down the air and causes your system to work harder.  While you should refer to the HVAC manufacturer’s manual to determine how often to change the filter, commonly the disposable filters you find in the ceilings or walls should be replaced every 30-90 days. Higher quality media filters can last up to 6 months.  This simple task only takes a few minutes but makes a world of difference for your indoor air quality.

Manage Humidity

As we all know, here in the Houston area, humidity is an issue. High humidity poses a threat to indoor air by encouraging mold to grow. Mold cannot grow unless there is moisture and that can include excessively high humidity. The ideal humidity inside a home is 30-50%. Here in the Houston area we are pretty lucky to maintain the indoor humidity at around 50%.  Use a hygrometer to monitor humidity levels and take action if they exceed 50%. The best ways to lower indoor humidity are through the use of a dehumidifier, ventilation fans, and the air conditioning system.

Many people don’t realize that the air conditioning system is called “air conditioning” and not “air cooling” because it actually “conditions” the air. It is designed to remove contaminants through the filtration as well as remove humidity through the cooling process. An efficiently operating HVAC system is crucial to managing humidity. Additionally, newer systems are designed much better than older ones in regards to airflow.  In my own house, I have a few rooms that simply don’t have enough airflow so I have installed portable dehumidifiers to help.

Houseplants Can Harm or Improve Indoor Air Quality

Certain species of plants have been proven to be air filters through scientific studies. Keeping some houseplants in your home can be beneficial for air quality if they are properly taken care of. Houseplants are detrimental to air quality when they are overwatered, causing mold to grow in the soil. If you choose to add houseplants to improve indoor air quality, learn about their care requirements and let the soil dry out between waterings. Excessive watering of houseplants can increase the home’s humidity as well so be careful.

Eliminate Dust Through Cleaning

While dust on the surfaces inside your home may not seem to affect the air, it actually does. If you see a dust layer on your furniture, it’s also in the air that you breathe. Dust and vacuum regularly to eliminate dust that pollutes indoor air.

Go Above and Beyond With Air Purifiers

The above tips for improving indoor air quality are relatively easy and affordable. If you are still having issues after trying these methods or want to go above and beyond, invest in HEPA air purifiers. These devices are especially useful for homes with pets or allergy sufferers. Read reviews before choosing your air purifiers, because they are a sizeable investment. While they are not too expensive to purchase, the cost adds up with the replacement filters. That is where the manufacturer makes its profit.

Here at Solidium Inspections, we are also licensed in mold assessment as well as indoor air quality. We provide home inspections to Houston, TX, and the surrounding areas. Contact us to request our services.

High humidity is uncomfortable indoors and outside. Humidity increases perspiration, worsens asthma symptoms, and creates an environment conducive to mold growth. Learn how to reduce humidity in the home to maintain safer and healthier living spaces.

Reasons to Reduce Humidity in the Home

Ideal indoor humidity levels are between 30-60%. Very high humidity causes your body temperature to rise. The body reacts by breathing faster and pumping less blood to your internal organs and brain. You might faint, suffer from heat exhaustion, or even experience heatstroke.
Failure to reduce humidity inside your home contributes to mold and mildew growth. Mold is dangerous as it triggers respiratory illnesses and allergy-like symptoms. Moisture in the air can also cause structural damage to your property including rotting wood, peeling paint, and damaged bricks, all of which may require costly repairs.

Ways to Reduce Humidity at Home

Indoor Plants

Although some houseplants add moisture to the air, especially when they’re overwatered, you can find indoor plants known for their dehumidifying properties. Peace lily tops the list of plants that help reduce humidity, plus it rids the air of some pollutants. Other natural dehumidifiers include Boston ferns, palms, orchids, spider plants, cactus, and English Ivy.

Proper Ventilation

Inadequate ventilation is the main cause of high humidity levels. Use ventilation fans properly, especially in areas that have excess moisture like the bathroom and kitchen, and you’ll reduce humidity in your home. When showering or cooking, open a window or use exhaust fans. In other areas of the house, a window fan can be used to increase air circulation.

Take Shorter or Cold Showers

If your home has high humidity levels, hot showers will make it worse. Take cooler showers or reduce the amount of time you spend bathing. If you choose to take a hot shower, open the bathroom window and turn on the fan to release the steam.

Proper Insulation Helps Reduce Humidity in the Home

If you have the budget for more expensive changes, invest in proper insulation to reduce humidity indoors. Although it can be costly, a properly insulated home will also lower your power bill by reducing the amount of power needed to heat and cool the home.

Keep Your Gutters Clean

Clogged gutters prevent water from being directed away from the foundation. As a result, water can leak into the basement or seep underneath the roofing shingles, causing algae and mold growth. Clean the guttering at least twice a year so that water is directed properly away from your home.

Solidium Inspections provides home inspections to customers in Houston, TX, and the surrounding areas. Contact us to request our services.

Thermal Imaging

Thermal imaging technology uses an infrared camera to document temperature variations in different objects and surfaces. These cameras are used in many applications and professions, one of them being home inspections. Thermal imaging in home inspections provides a more thorough inspection report because it can detect hidden issues that affect your home.

Thermal Imaging in Home Inspections Finds Air Leaks

Air can leak out through the tiniest openings around doors and windows. This reduces energy-efficiency because conditioned air is lost and the AC or furnace needs to work harder to replace it and keep your home comfortable. Small gaps and cracks are generally not visible to the naked eye, but an infrared camera will detect the temperature differences in these vulnerable areas.

Moisture Problems

A leak in a pipe behind the wall is often invisible until serious water damage has occurred and damaged your drywall. An infrared camera can help catch a leak in the early stages so that it can be repaired before it causes major damage and mold. The damp area will show up as a cooler color temperature than the rest of the wall.

Electrical Issues Detected by Thermal Imaging in Home Inspections

Electrical problems are one of the most common causes of house fires, so it is critical to get them fixed. Thermal imaging detects dangerous hotspots in the electrical system that can’t be seen otherwise.

Inadequate Insulation

Over time, insulation in the walls, ceilings, and floors may deteriorate, sag, or collect moisture. If this happens, the home will be less energy-efficient, and heating and cooling costs will be higher than normal. A thermal scan reveals areas where insulation is lacking or has gotten wet, so you can pinpoint precisely where it needs to be replaced.

When hiring a home inspector, ask if they use an infrared camera during home inspections. It’s best to choose an inspector who uses this tool so you get the most comprehensive information about your property.

Solidium Inspections provides Houston and the surrounding areas with home inspections, including thermal imaging. Contact us to request our services.